|
Main Menu
User Login
View By Aircraft
Users Aircraft
|
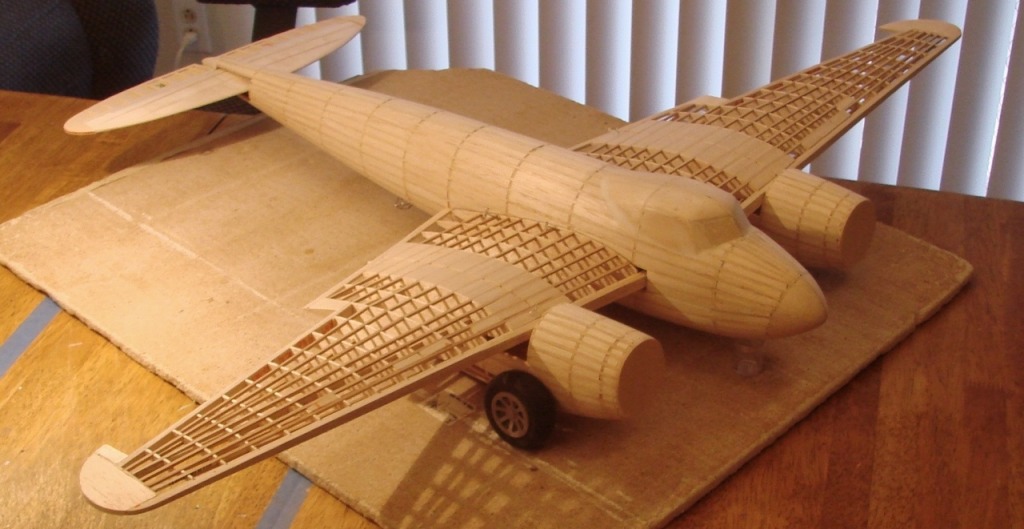
Cleveland de Havilland Mosquito by David Duckett. Viewed 558 times.
Build Thread
|
|
|
| Image Comments |
| David Duckett | 11-Mar-14 20:51 | | Stringers and the first two sections of infill |
| David Duckett | 11-Mar-14 21:10 | | To answer eagraber's question...after way too much of helter skelter, I've decided the best way to infill is between each rib/former at a time. I measure the distance between them in metric units, millimeters usually, and then cut a piece of wood from stock about 1 mm more than the longest distance measured. The distance between ribs here is about 23 so I cut 24 and a hair. To fit place the wood against a stringer and mark the wood with a soft pencil where it meets the opposite stringer. Once you make the cut you have only the distance between the formers to do and that requires one cut. In a perfect world those would be enough but until then...you'll find making very small cuts and light sanding is all you need to get the piece to fit. I do not cut each piece to an exact fit but rather enough for the piece to fit in the space without falling through. Once all the infill is complete I fill any small holes with Testors cement , wipe it off, and sand. The sawdust is glued in the hole and the hole is filled. That's what you see here. The object is to fill any small holes that would allow the filler coming next to fall through. I used 3/16" wood for most of the infill here and will use 1/8" stock for the outer panels. I used 1/4" stock on parts of the fuselage to give me more room to carve as there are several compound curves. And finally, I have done most of the wing with medium CA by putting a very small amount on each edge, much of it from the bottom. Questions? |
| eagraber | 11-Mar-14 21:37 | | Thanks! Very similar to my approach but I use 1/16" thick balsa. The thicker balsa should help - but require more sanding, I guess. And thanks for the info regarding the sawdust filler for gaps. Very helpful!! |
| David Duckett | 12-Mar-14 05:20 | | :-) |
|
|
Please sign in to comment on this image.
|
|
|
