| Build Thread, Page :
[ 1 ] 2 3 4 5 6 7 8 9 10 11 >> (306 posts, 20 posts per page, 16 pages in total)
|
[ Next > ] |
| bobgood, Comment for image # 5404 | 01 Nov 21 11:16 |
| Another super Poppy build from 07. |
| BriandKilby, Comment for image # 5077 | 08 Sep 13 07:31 |
| thanks poppy. |
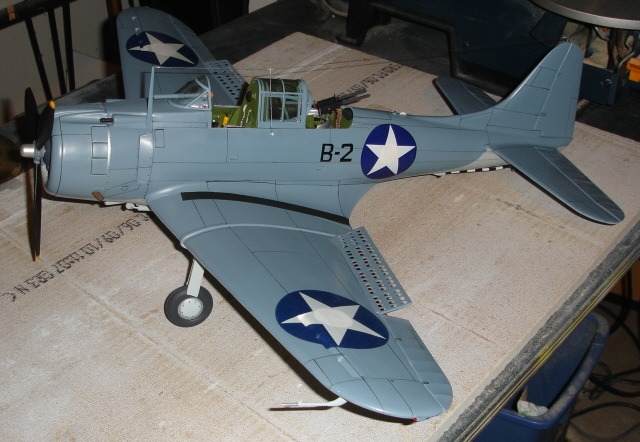
| poppy, Comment for image # 5077 | 08 Sep 13 07:18 |
| Brian, Slate blue top and light gray bottom. |
| BriandKilby, Comment for image # 5077 | 07 Sep 13 19:35 |
| poppy, might i ask you what colors you used on the upper and lower surfaces? brian. |
| meku, Comment for image # 5837 | 25 Apr 13 06:35 |
| Hello, SBD3 is very loved by you builders, all without exception are perfectly masterfully done, it is a beautiful plane, I want to build it.
Congratulations!!! |
| deckape, Comment for image # 5422 | 21 Mar 12 11:49 |
| HARDY WELL DONE In 1971 this kit was the state of the Art with all those scale opperating features and the cardstock interiers. I built the first release of this kit in the fall of 1971 aboard ship I got as far as the fuselage like my build i am doing herfe. I sent it home to my wife so I can finish it up when I came home on leave FPO San Fransisco lost my SBD in the fleets mail and never found. Boats |
| David Duckett, Comment for image # 5422 | 21 Mar 12 06:50 |
| I built this kit sometime around 2002 and painted it in these colors. I didn't know such things as this were possible so the interior was the cardstock included in the kit. |
| julinick, Comment for image # 25252 | 05 Mar 12 19:41 |
| Thanks for the tip Poppy. Once again, the dauntless is JFB!!!! |
| poppy, Comment for image # 25252 | 05 Mar 12 17:55 |
| But I do so before adding canopy and tires. |
| poppy, Comment for image # 25252 | 05 Mar 12 17:47 |
| Yes to both ?'s. |
| julinick, Comment for image # 25252 | 05 Mar 12 12:48 |
| Poppy, do you spray your models with a clear coat once the decals have been applied, and do you use testors? |
| poppy, Image # 25253 | 05 Mar 12 11:13 |

A modification to DD's original prop. Sorry DD. |
| poppy, Image # 25252 | 05 Mar 12 11:12 |
The old gal is down for a thorough cleaning. |
| dfrank47, Comment for image # 4998 | 20 Nov 10 11:52 |
| Do you build the stabilizers per plan or do you go another route? |
| dfrank47, Comment for image # 4572 | 15 Sep 10 17:50 |
| Thank you sir! I am going to take a stab at covering with sheet balsa, and your posts have been very helpfull. |
| poppy, Comment for image # 4572 | 15 Sep 10 08:56 |
| This pic doesn't clearly show but the balsa stringers and longerons were lightly sanded at the rear of the cowl to allow the 1/32" balsa skin to be blended to plastic. I also lightly sanded the skin afer installation. The wings would have required much more sanding to the ribs hence the extra plastic added to formed pieces. The rear plastic was removed and not used. |
| dfrank47, Comment for image # 4572 | 14 Sep 10 15:14 |
| It doesent look like you fir out these plastic pieces like you did on the belly pan and the wing slats, Am I looking at this correct? |
| Jedi, Comment for image # 5166 | 21 Jan 10 05:51 |
| How freeking cool is this!!!!! Love it!!!! |
| wingspanner, Comment for image # 5166 | 21 Jan 10 02:20 |
| JFB... |
| poppy, Comment for image # 5166 | 21 Jan 10 01:30 |
| For Stirling; I used thin plastic rod, mfg. by Evergreen and purchased at hobby shop, cut to length and sandwiched between thin strips of masking tape. I painted after putting them together. The sharp end of round toothpicks work also for the tapered bullet effect. I chose plastic 'cause it's easier to cut. |
| Build Thread, Page :
[ 1 ] 2 3 4 5 6 7 8 9 10 11 >> (306 posts, 20 posts per page, 16 pages in total)
|
[ Next > ] |
