| Hangar |
Aircraft |
Category |
Date |
Preview |
| Skyediamonds1985 | Guillows Series 200 - SE5a | Build | 09-Dec-15 15:49 | 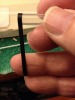 | | Views : 597 | | The tape was wrapped as many times necessary to achieve the desired thickness. In this case, it was just twice. |
| Skyediamonds1985 | Guillows Series 200 - SE5a | Build | 09-Dec-15 15:48 |  | | Views : 582 | | I noticed that the ends of the barrel were "capped." So, back to the cutting a thin strip from electrical tape. |
| Skyediamonds1985 | Guillows Series 200 - SE5a | Build | 09-Dec-15 15:45 | 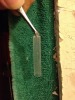 | | Views : 716 | | Using the drawings of the inboard and outboard profile drawings, combined with photos and the advertisement of the Vickers gun, it was just a matter of choosing the materials to start the build. In this case, I found a small cylinder_shaped piece of plastic to use as the main barrel. |
| Skyediamonds1985 | Guillows Series 200 - SE5a | Build | 09-Dec-15 15:40 |  | | Views : 610 | | I apologize in advance for using this same image of the main instrument panel. Just using it as another source of reference to where the Vickers gun is to be located and how much of it will be visible |
| Skyediamonds1985 | Guillows Series 200 - SE5a | Build | 09-Dec-15 15:37 | 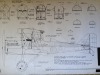 | | Views : 615 | | Same can be said for the outside profile. This also gives me the perspective that most of the Vickers gun will be hidden |
| Skyediamonds1985 | Guillows Series 200 - SE5a | Build | 09-Dec-15 15:35 | 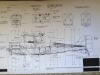 | | Views : 645 | | The inboard profile helps to determine the relationship of the Vickers gun to the fuselage. |
|
| Hangar |
Aircraft |
Category |
Date |
Preview |
| Skyediamonds1985 | Guillows Series 200 - SE5a | Build | 08-Dec-15 22:02 | 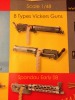 | | Views : 686 | | Many of the S.E. 5's employed the use to two different machine guns. Why, I do not know. Perhaps someone here has the answer. In the meantime, it really helps to have colorful advertisements of the gun to use as reference. |
| Skyediamonds1985 | Guillows Series 200 - SE5a | Build | 08-Dec-15 21:53 | 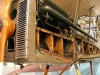 | | Views : 772 | | For those modelers contemplating on building the S.E. 5 in detail, I used this picture as a reference. |
| Skyediamonds1985 | Guillows Series 200 - SE5a | Build | 08-Dec-15 21:52 | 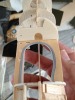 | | Views : 695 | | Final result. I added just a touch of filler to the right side, but that's it. The stiffner has cutouts for the throttle and plumbing. The main instrument panel is ready for wood staining,. Hope this helps. |
| Skyediamonds1985 | Guillows Series 200 - SE5a | Build | 08-Dec-15 21:48 | 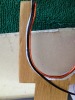 | | Views : 599 | | Just stretched the thin electrical tape around the perimeter and add a dash of super glue here and there. The white background is paper. This was my practice piece and I tried using paper cut out in duplicate of the form. It works, but I didn't like the final results. |
| Skyediamonds1985 | Guillows Series 200 - SE5a | Build | 08-Dec-15 21:45 | 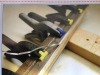 | | Views : 660 | | As you can see, some modelers have offered their solution to the rounded edging. Somehow, it appears too primitive, to say nothing of the risks dealing with the sharp edges. |
| Skyediamonds1985 | Guillows Series 200 - SE5a | Build | 08-Dec-15 21:42 | 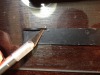 | | Views : 598 | | Okay, got the rounded edge. What about the overlap of metal? I decided to cut a thin strip of electric tape. When cut into thin strips, it is amazingly flexible. |
|
