| Hangar |
Aircraft |
Category |
Date |
Preview |
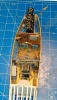
| edtherenderman | Aero-Werkes AW 11601 - Hannover CL IIIa | Build | 13-Apr-20 09:26 |  | | Views : 323 | | I’ve also covered and doped the wings, ailerons, rudder, upper and lower elevators and upper horizontal stabilizer. Using EZ-Dope, I found that a 2:1 Dope to Water mixture worked best for applying and sealing the tissue. Thin enough to apply and work without globs, but thick enough to stick the tissue and fill in the pores. It still took between five and seven coats to get them completely sealed though. |
| edtherenderman | Aero-Werkes AW 11601 - Hannover CL IIIa | Build | 13-Apr-20 08:58 | 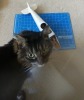 | | Views : 297 | | Evan my cat Chuck got into the act. She usually doesn’t care about this stuff, but I guess today, curiosity got the best of her! |
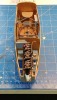
| edtherenderman | Aero-Werkes AW 11601 - Hannover CL IIIa | Build | 13-Apr-20 08:57 | 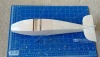 | | Views : 284 | | The bottom. I left a section open where the wing spars pass through the fuse. I'll fill that in during assembly. |
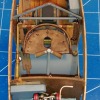
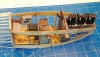
| edtherenderman | Aero-Werkes AW 11601 - Hannover CL IIIa | Build | 13-Apr-20 08:56 | 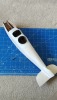 | | Views : 262 | | The back |
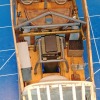
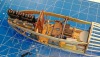
| edtherenderman | Aero-Werkes AW 11601 - Hannover CL IIIa | Build | 13-Apr-20 08:56 | 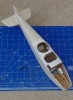 | | Views : 278 | | From the front |
| edtherenderman | Aero-Werkes AW 11601 - Hannover CL IIIa | Build | 13-Apr-20 08:55 | 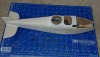 | | Views : 275 | | I’ve been busy over the last couple of weeks working on the Hannover. I 3D modeled and printed the cockpit combing. I used my FDM (Fused Deposition Modeling) printer with ABS plastic, instead of my DLP printer that I used for the interior parts. The FDM printer only has a resolution of 300 microns instead of 50, but for something as big as the combing, the high resolution isn’t as important. Plus the ABS is much more flexible and sandable, which is important since there are slight imperfections in the fuse I was able to accommodate by flexing the combing. I printed it in four parts, glued them together, sanded and filled as needed. Since this is ABS plasitc, I can use standard plastic model glues and fillers. The combing is attached to the previously sheeted fuse using thin and thick CA and kicker. Once set, I used Lightweight spackling to fill and sand. |
|
|