| Hangar |
Aircraft |
Category |
Date |
Preview |
| hjlittman | Guillows Series 200 - SE5a | Build | 21-Jul-18 16:00 | 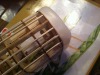 | | Views : 1167 | | I traced Former 1 onto a single piece of 1/16" sheet, cut it out and glued it into the back of the plastic nose with the nose reinforcement spacers. Since the plastic nose is meant to go over Former 1 that makes the fuselage 1/16" longer, but who's going to notice? Then I made a simple box key using the opening that existed in Former 1. The top and bottom of the hole is curved so I simply made the top and bottom of the box to match the curves. The key is quite snug and is perfectly aligned but I'm still going to add a couple of neodymium magnets to hold it in place. I hate loose nose blocks. |
| hjlittman | Guillows Series 200 - SE5a | Build | 12-Jul-18 15:29 | 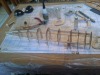 | | Views : 1267 | | I finshed the other side in 15 minutes and left for the dentist. Hint: half height formers are easier to install if you do it after the side keel in installed. More later today, Howard |
| hjlittman | Guillows Series 200 - SE5a | Build | 12-Jul-18 15:25 | 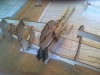 | | Views : 1073 | | I had 15 minutes between coming home from dropping my wife at work and leaving for a dentist appointment so I decided to do the other side of the fuselage. I used some laminated blade tools from another kit as guides to make sure the other half of the formers were in alignment. They happened to be in my building supply carrier but crafter's Popsicle sticks work just as well. I clamped them to the already aligned former with clothes pins, laid the half former against the guides, used a small Scuncii hair clip to clamp it down and applied glue. I find that the little Scuncii hair clips make very useful low pressure clamps. |
| hjlittman | Guillows Series 200 - SE5a | Build | 11-Jul-18 23:14 |  | | Views : 1044 | | There is a local FAC contest (Squadron 69) this Sunday for WWI (Mass Launch), Embryo, and Half Wakefield. I have my own Embryo, and have no plans to build a Half Wakefield, but thought I had a qualifying WWI model. (Let me rephrase that comment about the Half Wakefield. I have several plans for them I just don't plan to build one.) Anyway, I found that my ancient WWI model was in no condition to be restored, let alone fly, so I decided to build a new one for the contest. I had a #202, SE5A, kit on the shelf so I decided to build that "box stock" (Will have removable nose block, more aggressive prop, reinforced landing gear, F.A.I. Tan rubber, and colored tissue but other than that stock.) for the contest. It's not the most competitive choice, they fly much better than one might think and, I've seen them do quite well in competition. I started it about a half hour before I had to leave to pick up my wife this evening. I was using a right angle tool left over from another kit for alignment, odorless CA glue, and kicker. The photo shows how far I got. |
|
| Hangar |
Aircraft |
Category |
Date |
Preview |
|
