| Hangar |
Aircraft |
Category |
Date |
Preview |
| edtherenderman | Scratch Built Bugatti 100P | Build | 01-Jan-22 12:33 | 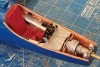 | | Views : 781 | |
| edtherenderman | Scratch Built Bugatti 100P | Build | 01-Jan-22 12:32 | 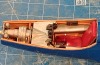 | | Views : 770 | | Happy New Year Everyone! Very close to finishing the Bugatti. Here is the interior. Wanted to get pictures before I put the canopy on! |
| BriandKilby | Guillows 1903 Wright Flyer | Parked | 29-Dec-21 10:45 |  | | Views : 4308 | | rigging. |
| BriandKilby | Guillows 1903 Wright Flyer | Parked | 29-Dec-21 10:45 |  | | Views : 4321 | | front stand next. |
| BriandKilby | Guillows 1903 Wright Flyer | Parked | 29-Dec-21 10:44 | 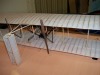 | | Views : 4301 | | rear of wright flyer. |
| edtherenderman | Scratch Built Bugatti 100P | Build | 27-Dec-21 18:14 |  | | Views : 709 | | Work continues! Spent last five days working on the plane. Redesigned and 3D printed the transmission because the original would not fit in the plane the way I wanted. Designed and photo printed gauge faces for the dash, installed and put clear epoxy over them to create the glass faces (see above). Almost all interior parts are painted. Cut and fitted the two canopy pieces. And wet sanded the aircraft exterior. I ran out of rubbing compound, and since it snowed here yesterday, I’ve been pretty much stuck in the house. So I figure next weekend will be my opportunity to finish detailing the fuse. After that, it’s installing all the parts, final fitting, etc. Getting close to done! |
|
| Hangar |
Aircraft |
Category |
Date |
Preview |
| BriandKilby | Guillows 1903 Wright Flyer | Build | 24-Dec-21 18:19 |  | | Views : 4256 | |
| edtherenderman | Scratch Built Bugatti 100P | Build | 24-Dec-21 11:37 | 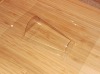 | | Views : 825 | | Canopy with |
| edtherenderman | Scratch Built Bugatti 100P | Build | 24-Dec-21 11:37 | 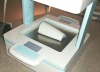 | | Views : 782 | | What it looks like after hot material is formed over Buck. |
| edtherenderman | Scratch Built Bugatti 100P | Build | 24-Dec-21 11:36 | 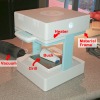 | | Views : 845 | | I bought myself a Christmas present after trying to 3D print clear canopies, a hobbyist vacuum former! This one has a 6” X 6” surface although you can’t really go that large. I’m finding 4” to be about max. The former is pretty simple: 1) Put 20 mil TPE plastic between the two halves of the Material Frame, which are held together with magnets. 2) Place the Material Frame under the Heater. Magnets will hold it in place. 3) Turn on the heater. 4) Wait until the material sags about 1.5”. This takes about 10 minutes. 5) Place Buck on Grill. 6) Turn on Vacuum. 7) In one quick motion, push Material Frame down onto the Buck / Grill. Vacuum will suck hot material around the buck. This was probably overkill, but I figure I do enough scratch building that something like this will be handy! |
| Don C | Scratch Built Vultee BT-13 | Build | 23-Dec-21 17:52 | 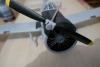 | | Views : 5187 | | Prop done. Needs Hamilton Standard decal before installing.It and they're on order from Callie. |
| Don C | Todays Hobbies F-16a Falcon | Parked | 23-Dec-21 17:40 |  | | Views : 4283 | | This is when I handad it to its pilot. Really made it worth the effort.pilot. |
|
