| Hangar |
Aircraft |
Category |
Date |
Preview |
| Skyediamonds1985 | Guillows Series 800 - Stearman PT-17 | Build | 03-Jul-15 19:30 | 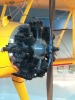 | | Views : 818 | | One of the more unique characteristics of this particular radial, is the main elect. harness is located behind the cylinders, with the front spark plug wiring being diverted around the cylinders to the back, the exhaust manifold is inside the nose, and each cylinder has extra cooling fins for their own respective exhaust outlets, and the push rods are behind the cylinders as well. |
| Skyediamonds1985 | Guillows Series 800 - Stearman PT-17 | Build | 03-Jul-15 19:19 |  | | Views : 754 | | First, need to carefully observe the Continental R-670s. If they used the Lycoming R-680s, then they're designated PT-13s. Go figure. |
| Skyediamonds1985 | Guillows Series 800 - Stearman PT-17 | Build | 03-Jul-15 19:01 | 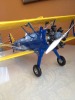 | | Views : 850 | | Okay guys. This is my first model after almost 30 years of abstinence. With it, comes trials & tribulations with dashes of lessons learned (and errors to avoid). Keep in mind, all I have are: a pair of tweezers, needle nose pliers, scissors, an X-Acto knife and lots of imagination. Going to start off on how I (somehow) managed to scratch build the radial engine for the Guillow's PT-17. |
| Skyediamonds1985 | Guillows 1903 Wright Flyer | Parked | 30-Jun-15 20:48 | 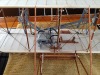 | | Views : 4839 | | There you have it. I might add I installed the engine cooling tubes just prior to installing the front elevator assembly. |
| Skyediamonds1985 | Guillows 1903 Wright Flyer | Build | 30-Jun-15 20:39 | 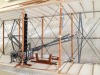 | | Views : 4731 | | With most of the rigging complete, the rear struts were finally installed and the rear portion of the rigging complete. I might add that the wing-warping rigging is confined to the two outer most rear struts only. |
| Skyediamonds1985 | Guillows 1903 Wright Flyer | Build | 30-Jun-15 20:32 | 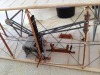 | | Views : 3906 | | Its only after the wing-warping and internal rigging is complete, when the "outside" rigging is started. Note the fuel line being routed around the struts to the tank. Some pictures show the fuel line hanging off the leading edge, some pictures show it to be more tight. It was just an arbitrary decision on my part. Just seemed to "look right." |
|
| Hangar |
Aircraft |
Category |
Date |
Preview |
| Skyediamonds1985 | Guillows 1903 Wright Flyer | Build | 30-Jun-15 20:24 | 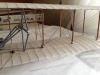 | | Views : 3707 | | With the wing-warping complete, now starting on the internal rigging (called longitudinal, according to the blue prints) |
| Skyediamonds1985 | Guillows 1903 Wright Flyer | Build | 30-Jun-15 20:08 | 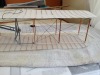 | | Views : 3891 | | This is the underside of the top wing. The wing warping rigging is complete. No other rigging is (yet) installed and lack of the remaining rear struts helps me to get my hands inside. |
| Skyediamonds1985 | Guillows 1903 Wright Flyer | Build | 30-Jun-15 20:00 | 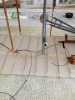 | | Views : 3815 | | Rigging wing-warping first. Home made pulley is near the strut small tubular beads were purchased at local arts & crafts store |
| Skyediamonds1985 | Guillows 1903 Wright Flyer | Build | 30-Jun-15 19:56 |  | | Views : 3800 | | All the main accessories are in place. Held off installing the rear struts to allow room for my hands and tools. |
| Skyediamonds1985 | Guillows 1903 Wright Flyer | Build | 30-Jun-15 19:50 | 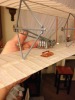 | | Views : 3728 | | The left prop drive assembly is complete. This whole assembly is held in place by the main tube just glued to the engine axle and the other end to the prop mount. Pretty fragile set up. |
| Skyediamonds1985 | Guillows 1903 Wright Flyer | Build | 30-Jun-15 19:42 |  | | Views : 3639 | | The assembly is complete. The main support is on top, the two tubes containing the drives chains are on the bottom supported by a small brace. |
|
