| Hangar |
Aircraft |
Category |
Date |
Preview |
| kenm94591 | Dumas Kit #223, P-26 Peashooter | Parked | 25-Mar-19 14:40 |  | | Views : 364 | | All clinders added to the P-26 engine and now ready to install the push rods. |
| kenm94591 | Dumas Kit #223, P-26 Peashooter | Parked | 24-Mar-19 14:51 | 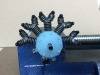 | | Views : 341 | | Well what I envisioned as a R-1340 Wasp engine for the P-26 is coming together. Five cylinders down and four to go. May need to do some touch up of the silver paint. Will need to add push rods, spark plugs and wires to the front. The back will need exhaust and intake pipes for the manifold added. |
| kenm94591 | Dumas Kit #223, P-26 Peashooter | Parked | 23-Mar-19 17:41 |  | | Views : 302 | | The crankcase cover has been glued in place and the first coat of primer applied. I like the way the hex nuts look. |
| kenm94591 | Dumas Kit #223, P-26 Peashooter | Parked | 23-Mar-19 14:21 |  | | Views : 416 | | Crankcase with the bronze thrust bearing for the intake manifold glued in place. Used small coffee stirrers instead of the bamaboo rod. Will glue larger stirrers to the small stirrers so the set screws will have a tight fit. |
| kenm94591 | Dumas Kit #223, P-26 Peashooter | Parked | 22-Mar-19 17:52 |  | | Views : 378 | | The P-26 crankcase needs bolts so I first drilled with a .5mm bit followed with a 1mm and then a final 1.5mm bit. Inserted and glued 1.4mm hexagon rod to represent the bolt heads. Did not need to do this since the bolt heads will be covered with the heat shield but I will know they are there and should be. |
| kenm94591 | Dumas Kit #223, P-26 Peashooter | Parked | 21-Mar-19 14:09 | 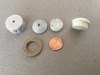 | | Views : 436 | | Some of the parts for the P-26 crankcase, crankcase cover and intake manifold. |
|
| Hangar |
Aircraft |
Category |
Date |
Preview |
| kenm94591 | Dumas Kit #223, P-26 Peashooter | Parked | 20-Mar-19 15:59 | 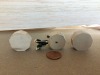 | | Views : 327 | | Three of the bad crankcases. Total of six before I got the one that was correct. Turns out I need to go back to grade school to leaarn how a protractor works. |
| kenm94591 | Dumas Kit #223, P-26 Peashooter | Parked | 17-Mar-19 13:56 |  | | Views : 395 | | The unpainted push rods for the engine of the P-26. The rods are 3/32" brass rods and the connectors at each end are heat shrink tubing. The longer tubing go to the top and the shorter goes to the bottom of the push rods. The top is made from 5/64" heat shrink tubing that has been shrunk and is tight and cannot be moved. The bottom is made from 3/32" heat shrink tubing that was shrunk and then cut into small sections. Because it is 1/64" larger than the top tubing it can be slid on and off the brass rod. I will glue the top to the engine header and after it dries slide the bottom piece into place and glue. At the scale I am working that little play allows for a tight fit. I will touch up the paint after the glue dries. |
| kenm94591 | Dumas Kit #223, P-26 Peashooter | Parked | 16-Mar-19 20:47 |  | | Views : 476 | | This is a very rough protopye to check the look and build of one of the nine cylinders or the Wasp engine. The "crankcase" is one inch in diameter with nine flats for each of the cylinders. Start by drilling a hole and inserting small bamboo rod and then inserting a small piece of coffee stirrer over that. The set screw is then glued in place and the other two set screws are glued to the cylinder. Half round styrene rod is uesd for the headers. 3/64" carbon steel music rod is used for the push rods. Will not be using that on the actual build. 3/16" strips of masking tape is used at the top and bottom of the push rods to replicate the connectors to the crankcase and headers. Masking tape will not be used for final motor. I am having trouble trying to build the spark plugs as they are 1/16" long and 1/64" round. |
| kenm94591 | Dumas Kit #223, P-26 Peashooter | Parked | 15-Mar-19 16:56 |  | | Views : 524 | | So my wife dug out the scroll saw and rough cut the crank case for the P-26. She then filed everything down to just above the black line (note to self - basswood is hard). jBecause of my eyesight and shakey hands my wife helped. Now I have to sand down to the black line. Not sure which color to use for the engine. Left to right I have brass, steel or black. |
| kenm94591 | Dumas Kit #223, P-26 Peashooter | Parked | 14-Mar-19 19:15 | 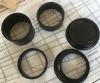 | | Views : 312 | | I have a Dremel and the Dremel work station so I chucked up a cutoff wheel set it to the heigth I wanted. Was able to push and turn the pipe so I got it cut to the proper length. Left side is before cutting. Center is the result of cutting. Right side is c coffee lid with and without center cut out. Turns out a coffee lid fits the new cowl perfectly and has a lip on it which I am hoping I can use it to provide the correct profile. |
| kenm94591 | Dumas Kit #223, P-26 Peashooter | Parked | 13-Mar-19 21:53 |  | | Views : 427 | | It looks like the crankcase is going to be about 1" point to point. Ignore the outer circle on the yellow paper. Let's see if everything fits. |
|
