| Hangar |
Aircraft |
Category |
Date |
Preview |
| kenm94591 | Dumas Kit #223, P-26 Peashooter | Parked | 29-Oct-20 19:17 | 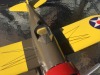 | | Views : 427 | | The head rest per the plans was two pieces of triangle cut wood and looks noting like the prototype so I carved it from some 1/2 x 1/2 balsa to the profile of the XP-936. The seat appears to be made of canvas on the original. Carved from some balsa then covered in surgical tape to give some texture. Colored with a yellow hi-liter to not fill in the texture. |
| kenm94591 | Dumas Kit #223, P-26 Peashooter | Parked | 27-Oct-20 19:35 | 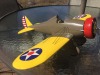 | | Views : 465 | | The P-26 is completed and unfortunately I lost the build pictures. I built this as the XP-936 which was the prototype. A lot of changes from the plans and the paint scheme is a little bland but thats the way it left the Boeing factory. The exhaust running into and out of the fuselage did not turn out like I wanted it to look but it is what it is. |
| kenm94591 | Dumas Kit #223, P-26 Peashooter | Parked | 26-Oct-20 13:27 | 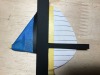 | | Views : 370 | | This is the tool a friend made for me to use in painting. |
| kenm94591 | Dumas Kit #223, P-26 Peashooter | Parked | 26-Oct-20 13:26 | 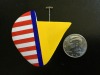 | | Views : 361 | | Painting the tail was a real challenge getting the lines parallel and the same width. Could not use the decal with the kit since I had to resize to get the correct profile. |
| kenm94591 | Dumas Kit #223, P-26 Peashooter | Build | 20-Oct-20 16:53 | 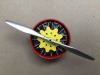 | | Views : 423 | | This is the finished engine with the propeller. The ring was made from a 2" slip joint that was sanded to an almost correct profile. Yes the propeller spins. |
| kenm94591 | Dumas Kit #223, P-26 Peashooter | Build | 17-Oct-20 13:44 | 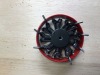 | | Views : 448 | | This is the back of the engine with the intake manifolds installed. Since they are black they seem to disappear. |
|
| Hangar |
Aircraft |
Category |
Date |
Preview |
| kenm94591 | Dumas Kit #223, P-26 Peashooter | Build | 17-Oct-20 13:42 |  | | Views : 395 | | This is the housing for the air intake housing at the back of the engine. |
| kenm94591 | Dumas Kit #223, P-26 Peashooter | Parked | 16-Oct-20 13:32 | 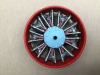 | | Views : 524 | | Back to the engine. This is most of the front finished with the spark plug wires. |
| kenm94591 | Dumas Kit #223, P-26 Peashooter | Parked | 15-Oct-20 16:31 | 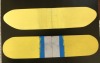 | | Views : 492 | |
| kenm94591 | Dumas Kit #223, P-26 Peashooter | Parked | 21-May-19 20:03 | 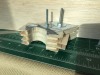 | | Views : 680 | | After sanding the landing gear to size I then added 1/16” balsa to each side of the 1/4" balsa to get the correct size opening for the wheels. Cut another pattern from cardboard this time (actually it was from the chocolate covered cherry box from Christmas). Everything was screwed together again and using my dremel in my workstation with a drum sander I sanded out the wheel area. I then had to sand the 1/16” balsa to the correct shape. |
| kenm94591 | Dumas Kit #223, P-26 Peashooter | Build | 21-May-19 19:47 | 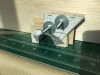 | | Views : 608 | | In order to get the landing gear identical I stole and idea from Poppy or John Oshust can’t remember which. I cut two patterns from .090” vinyl plastic of the landing gear as I was going to use one for the front and the other the back. I then cut three blocks of ¼” balsa put the patterns on the front and back of the balsa and drilled two holes for the screws and washers. Reason for three was I assumed one would be messed up and didn’t want to have to do everything again. My wife then cut the balsa to roughly the outline I wanted on the jigsaw. I then sanded everything to the pattern to get the final size. |
| kenm94591 | Dumas Kit #223, P-26 Peashooter | Build | 21-May-19 16:19 | 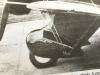 | | Views : 532 | | This is what I am looking for which is XP-936. I like the look and have decided to build this model as the original XP-936. |
|
