| Build Thread, Page :
1 2 3 4 5 [ 6 ] 7 8 9 10 11 >> (351 posts, 20 posts per page, 18 pages in total)
|
[ < Prev ] [ Next > ] |
| John M Oshust, Image # 5465 | 26 Dec 07 16:29 |

Exhaust system completed and painted. Rotunda can now expell GAS! |
| John M Oshust, Image # 5464 | 26 Dec 07 16:27 |

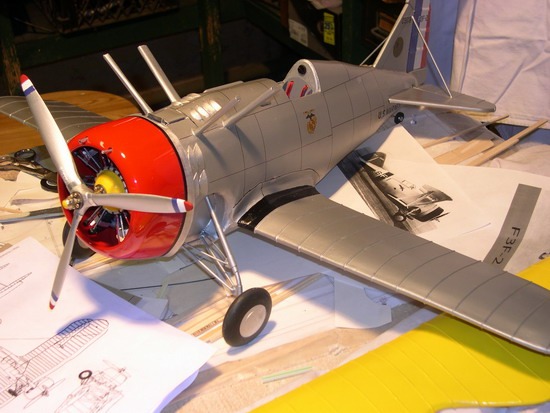
Wing struts fitted...Rotunda waits for the epoxy to set! |
| John M Oshust, Image # 5462 | 26 Dec 07 10:34 |

Upper wing is positioned on the cabane struts. Now I must fit the wing struts. |
| JohnG., Comment for image # 5454 | 25 Dec 07 18:59 |
| Terrific!! Make room guys, there's a new gun in town. |
| John M Oshust, Image # 5458 | 25 Dec 07 18:52 |

Finally added the two down stacks for the exhaust.They are on the right and left of the oil cooler intake. |
| John M Oshust, Image # 5457 | 25 Dec 07 18:49 |

Two pair of long rigging wires are needed for each pair of wings, but only after the wings are attached. |
| John M Oshust, Image # 5456 | 25 Dec 07 18:47 |

After Xmas din-din, I started the rigging. The son gave me a new Sony digi for Xmas, my first attempt at its use. |
| John M Oshust, Comment for image # 5454 | 25 Dec 07 18:44 |
| Fexible plastic ruler and patience! |
| moostang51, Comment for image # 5454 | 25 Dec 07 16:53 |
| Masking tape, straight-edge and a set of dividers worked for me. Nice job. |
| Barnstormer, Comment for image # 5454 | 25 Dec 07 16:28 |
| This is looking spectacular John. Im glad you solved the decal problem. Merry Christmas to you and all at V.A. |
| John M Oshust, Image # 5454 | 25 Dec 07 14:56 |

Moos...you were correct , the lines make a difference, now I wish I did this to the Mig. |
| John M Oshust, Image # 5453 | 25 Dec 07 14:54 |
Now that the panel line challege is past , I may fit the upper wing. |
| John M Oshust, Image # 5452 | 25 Dec 07 14:53 |

Tried my hand at panel lines...Moos, poppy, DD...how did I do? |
| John M Oshust, Image # 5451 | 25 Dec 07 14:51 |

Prop paint finished, cowl paint and strip finished. |
| John M Oshust, Image # 5450 | 25 Dec 07 14:49 |

Rotuna is armed. The F3F-2 had a 50 on the right...30 on the left. |
| JohnG., Comment for image # 5440 | 25 Dec 07 11:41 |
| The more I see it, the more I like the red. |
| John M Oshust, Image # 5440 | 25 Dec 07 10:30 |

jedi helped me solve my supply needs. All I need to get is some white decal paper. This size is perfect! |
| SteveM, Comment for image # 5439 | 25 Dec 07 01:11 |
| Sorry for the double post, not sure how that happened. Maybe James can delete it. |
| SteveM, Comment for image # 5439 | 25 Dec 07 01:09 |
| The way I do it is to use the "Snapshot Tool" in Adobe Reader to copy the decal then paste it into a photo editing program. Some people can afford Photoshop, but I like GIMP as it is free and works on Linux, Mac, and the Windows virus suite.
Use your favorite photo editing software to scale the image to the size you need. Print the scaled image in grayscale to double check the size and then print color when you are satisfied with the scaled decal.
When saving your decals I suggest a lossless format such as PNG. The JPG format is great for making a small file, but each time you edit the file and save it you lose picture quality (much like copying a VHS tape). |
| Build Thread, Page :
1 2 3 4 5 [ 6 ] 7 8 9 10 11 >> (351 posts, 20 posts per page, 18 pages in total)
|
[ < Prev ] [ Next > ] |
