| Build Thread, Page :
1 2 3 4 5 [ 6 ] 7 8 (141 posts, 20 posts per page, 8 pages in total)
|
[ < Prev ] [ Next > ] |
| Pauli72, Comment for image # 26298 | 09 May 12 10:03 |
| @ RTD89. Your awsome Guillow's P-51 scratch cockpit from Feb./Mar. served as the inspiration, and technique for the instrument panel. Thanks for the build help.
@ David Duckett...Thanks David. I'm still trying to figure this camera out. I only bought it to post pictures here. All photography help is welcome. I should really take some time to figure this thing out. |
| TJH, Comment for image # 26298 | 09 May 12 10:03 |
| Really nice detail! |
| David Duckett, Comment for image # 26298 | 09 May 12 09:51 |
| A suggestion: Digital cameras do NOT require flash. Using flash washes out details making things "milky". |
| RTD89, Comment for image # 26298 | 09 May 12 09:51 |
| Nice! |
| JohnG., Comment for image # 26298 | 09 May 12 09:41 |
| Excellent!!!! |
| jerry campbell, Comment for image # 26298 | 09 May 12 09:34 |
| It sure is, great looking cockpit! |
| Pauli72, Image # 26298 | 09 May 12 09:24 |

It's gettin there. |
| Pauli72, Image # 26297 | 09 May 12 09:22 |

Instrument panel done. I cut the basic shape from a piece of cardstock and covered both sides with black electrical tape. Then used a spent .223 brass rifle casing as a punch to make holes. Then glued a piece of clear plastic from a clamshell package to the back of it. Then I used a toothpick with white testors model paint (before my morning coffee) to make gauge markings on back of the plastic so it looks like everything is behind shinny glass. Then backed it with another couple strips of electrical tape. Common pins serve as switches on bottom row. |
| poppy, Comment for image # 26069 | 07 May 12 15:48 |
| I wish my first attempt had turned out like this beauty. |
| Creosotewind, Comment for image # 26069 | 07 May 12 10:08 |
| Very nice work all the way around. I like what you have done with the working features as well. Good job! |
| Pauli72, Image # 26273 | 07 May 12 08:49 |
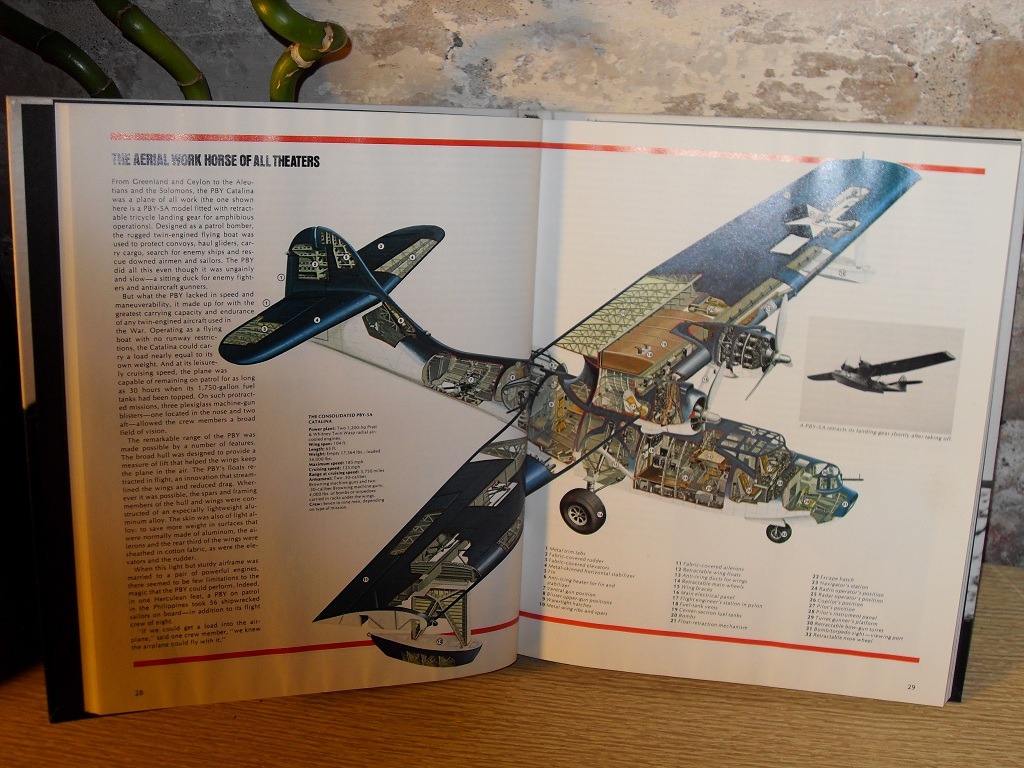
For Deckape. I found this page in my TIME LIFE, WW II book series / War in the Outposts. You can zoom in on your computer to read the details. |
| Pauli72, Comment for image # 26084 | 25 Apr 12 14:42 |
| Thanks guys. It's been a while since I've done a build. The rust is coming off. LOL! She's still got a ways to go though. Now that I have a camera that doesn't require a flash-pan, and black cape over my head to operate, I'll be able to keep up with the build pics a little better. ;-) |
| Pauli72, Comment for image # 26069 | 25 Apr 12 14:29 |
| Thank you very much guys. I have always wanted to try a scratch built cockpit. I used the cardstock Guillow's cockpit as a template to make a balsa tub & made the seats and instruments from odds and ends around the house. Sorry about the poor quality photo...new camera. |
| Pauli72, Comment for image # 26068 | 25 Apr 12 13:18 |
| My original intent was to just cover the 2 fuselages & center nacelle with heavy silkspan, and dope, hence the scalloped formers. But after seeing the awsome looking results with infill, I decided to give it a try. Thanks Dave. |
| Dale1416, Comment for image # 26084 | 25 Apr 12 11:37 |
| Wow! Glad that your work has surfaced on this site. Very interested in following your progress on the P-38. Terrific job of displaying your build. This is one I've been itching to do. |
| deckape, Comment for image # 26084 | 25 Apr 12 10:45 |
| Ahoy Paul72 gtreat job on the forktail devil, first time I ever seen one of these built up your doing a swell job on her. boats |
| David Duckett, Comment for image # 26068 | 25 Apr 12 07:09 |
| :-) |
| frwyflyer, Comment for image # 26069 | 25 Apr 12 06:16 |
| YES INDEED!! VERY VERY NICE!! |
| stirling, Comment for image # 26084 | 25 Apr 12 03:29 |
| This is gunna be a stunner I reckon. |
| stirling, Comment for image # 26069 | 25 Apr 12 03:27 |
| Very, very nice!!
|
| Build Thread, Page :
1 2 3 4 5 [ 6 ] 7 8 (141 posts, 20 posts per page, 8 pages in total)
|
[ < Prev ] [ Next > ] |
