| Hangar |
Aircraft |
Category |
Date |
Preview |
| pfinn | Jetco Dayton-Wright RB-1 | Build | 13-Feb-11 23:24 |  | | Views : 1086 | | After some serious deliberation, I decided to bite the bullet and install scale action retracts. The gaping holes lead to some creative reinforcement while leaving room for the "Monkey Motion". For time time being , I'm leaning towards pneumatics. We'll see. |
| pfinn | Scratch Built IL-2 Sturmovic | Reference | 06-Feb-11 16:00 |  | | Views : 1151 | | Well, for what it's worth. ARF micro "Mossy". Finally some three blade regular and matching contra-rotating props for my stuff! Here's a link with video. http://www.horizonhobby.com/Products/Default.aspx?ProdID=PKZU1380 |
| pfinn | Jetco Dayton-Wright RB-1 | Build | 29-Jan-11 09:52 | 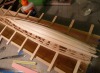 | | Views : 1027 | | Bevel the edges to match longeron angles. I used good 'ol Elmers to bond. A little CA at the rear pointy side. |
| pfinn | Jetco Dayton-Wright RB-1 | Build | 29-Jan-11 09:49 | 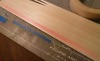 | | Views : 922 | | Here is the pattern on the Balsa. Use a marker (before you stick it down!) to make it more visible. When cutting long smooth curves like this I find that during the cut, looking ahead about 3/8" to 1/2" results in a smoother cut that follows the line much more closely. "Leading the cut". |
| pfinn | Jetco Dayton-Wright RB-1 | Build | 29-Jan-11 09:43 | 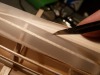 | | Views : 972 | | Carefully cut along the edges. |
| pfinn | Jetco Dayton-Wright RB-1 | Build | 29-Jan-11 09:40 | 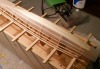 | | Views : 1024 | | Infilling selected areas between stringers. To make a pattern, I used non-flexible tape (Magic/removable) stuck down only to the two longerons to be filled between. Don't stretch tight. I used a small staightedge and adhered the tape to the edges center out to allow the tape to "Skew" (?) as the plane twisted. |
|
| Hangar |
Aircraft |
Category |
Date |
Preview |
| pfinn | Jetco Dayton-Wright RB-1 | Build | 28-Jan-11 14:02 | 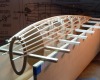 | | Views : 1092 | | I do like using the Jig. |
| pfinn | Jetco Dayton-Wright RB-1 | Build | 28-Jan-11 14:01 | 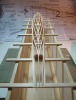 | | Views : 1012 | | This type af layout is a bit challenging in some respects. |
| pfinn | Jetco Dayton-Wright RB-1 | Build | 28-Jan-11 13:59 | 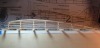 | | Views : 942 | | As per plan, the stingers are arranged ala "Waterline". Meaning they are parralel to the axis of the fuselage. |
| pfinn | Jetco Dayton-Wright RB-1 | Build | 27-Jan-11 11:48 | 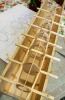 | | Views : 939 | | Time for stringers and in-fll where needed. After a couple times, this method could be darn quick. Very straight. |
| pfinn | Jetco Dayton-Wright RB-1 | Build | 27-Jan-11 11:43 | 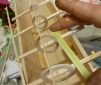 | | Views : 967 | | In hindsight, I should have just waited to notch the formers until this point. Not that they were off (well, not too much! ;o) ). |
| pfinn | Jetco Dayton-Wright RB-1 | Build | 27-Jan-11 11:39 | 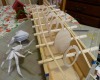 | | Views : 929 | | The jig has bulkhead positions marked on the side walls. I used pins to help easily locate tthe bulkheads. Again, double stick tape is used to secure the cross members to the fixture. Other builders use rubber bands to do this using a row of small brads near the base in which to hook the bands to.The 2" offset marks line up with the edge of the fixture so all of the formers line up correctly. |
|
