| Build Thread, Page :
1 2 3 4 5 [ 6 ] 7 8 (144 posts, 20 posts per page, 8 pages in total)
|
[ < Prev ] [ Next > ] |
| David Duckett, Image # 4983 | 10 Nov 07 09:43 |

|
| David Duckett, Image # 4982 | 10 Nov 07 09:41 |

As soon as it's daylight, and warm enough, I'll start covering these outside. There's too much area involved to use dope inside. The frames have all been prepped with two coats of 50/50 white glue/water (more or less) and sanded smooth. |
| moostang51, Comment for image # 4969 | 10 Nov 07 05:32 |
| John, go to www.jacksonhobby.com. Prices are pretty reasonable and they carry just about everything, though some items can be found on line cheaper but factor in shipping...well you get the idea. Frank the owner will also answer any question you might have. I go there often just to browse and chat. An amazing scratch built p-40 and Corair hang from the ceiling. |
| John M Oshust, Comment for image # 4969 | 09 Nov 07 22:09 |
| Moos....Where is your local hobby shop? I need one! |
| moostang51, Comment for image # 4969 | 09 Nov 07 17:02 |
| Hey "O"!!!Saw the Texan, me109, P47 and P51 today at mt LHS while picking up CA+ and 2" stock to turn a spinner. I think they were $53.95. David, as you said these are "off scale" and built for flying. Between us modelers it might be a concern but who really would know. Scale on this aircraft would be about 29 5/16" long and 34 1/2" ws. See, studying engineering in college paid off. I don't think the cowl is too long rather that the wing in scale would be much further up past the air louvers. But again it's built to fly. Guillow's kits, though we have problems with balsa quality are actually almost exact to scale dimensionwise. BTW, this looks great. Precision construction as usual. |
| David Duckett, Comment for image # 4969 | 09 Nov 07 16:00 |
| Well yes you did, and well done you did it, too. (;-) ) They are at www.houseofbalsa.com and I'm sure at many other stores, as well. On this one the wing is too big chord wise and set back at least an inch too far and I think the cowl is perhaps too long, all to make it fly. Since mine will never fly, I'll just use a little more paint to camo it. It also has peel and stick crosses which I will not use. Except for the tripled in thickness tail feathers and the spars on the wing, it's built strictly per plan. |
| John M Oshust, Comment for image # 4969 | 09 Nov 07 14:48 |
| DD....do you have a web address for me. I really like what I see in this kit. A flying model can be modified to be more scale, I did that on the Mig. |
| David Duckett, Comment for image # 4969 | 09 Nov 07 12:54 |
| Thanks folks, it's a pleasure to work with good wood. John O, you would would love the kits but they are not scale. They are described as 1/12 scale but all the wings are built exactly the same and are the same length and chord with wing tip blocks making the difference. They all have 36" wingspans and this one should actually be 34". These are designed for flying so I guess the wing works well in the air. There is a ME 109 and a Bonanza in the series which look alright but the Mustang and P 47 look odd. The photo instructions are superb and it's really a simple kit, with a lot of sanding. Works for me. |
| cdwheatley, Comment for image # 4969 | 09 Nov 07 12:26 |
| Superb craftmanship David. I especially like the carving and sanding around the cowl. 'Tis a thing of beauty. |
| John M Oshust, Comment for image # 4969 | 09 Nov 07 11:46 |
| Nice job DD...beautious! I am covering Spirit wings and making wood wing tips today...hugs "O" |
| poppy, Comment for image # 4969 | 09 Nov 07 09:38 |
| Looking good. Wing construction like the old Struct-O-Speed kits. |
| David Duckett, Image # 4969 | 09 Nov 07 07:21 |
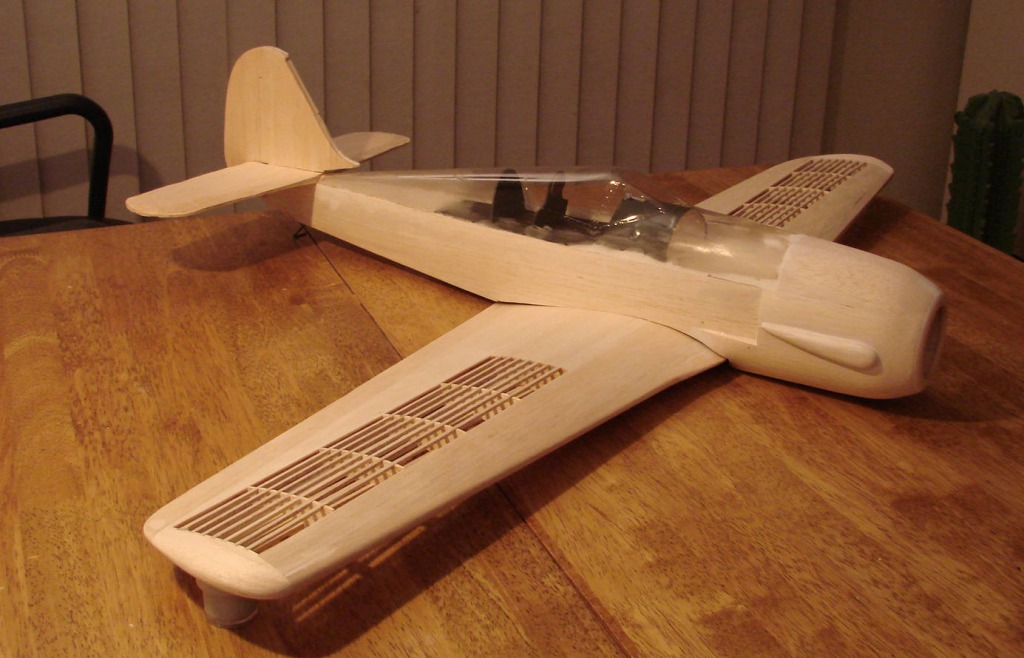
Sanding |
| poppy, Comment for image # 4964 | 06 Nov 07 22:44 |
| Looking good. The carving and shaping is beautiful work. |
| Barnstormer, Comment for image # 4964 | 06 Nov 07 22:12 |
| Looking great, Cant wait for the paint. Beautiful work. |
| David Duckett, Image # 4964 | 06 Nov 07 22:04 |

Tail feathers are now 5/16" thick. Cowl bumps are made from 1/4" blocks. |
| David Duckett, Image # 4963 | 06 Nov 07 22:02 |
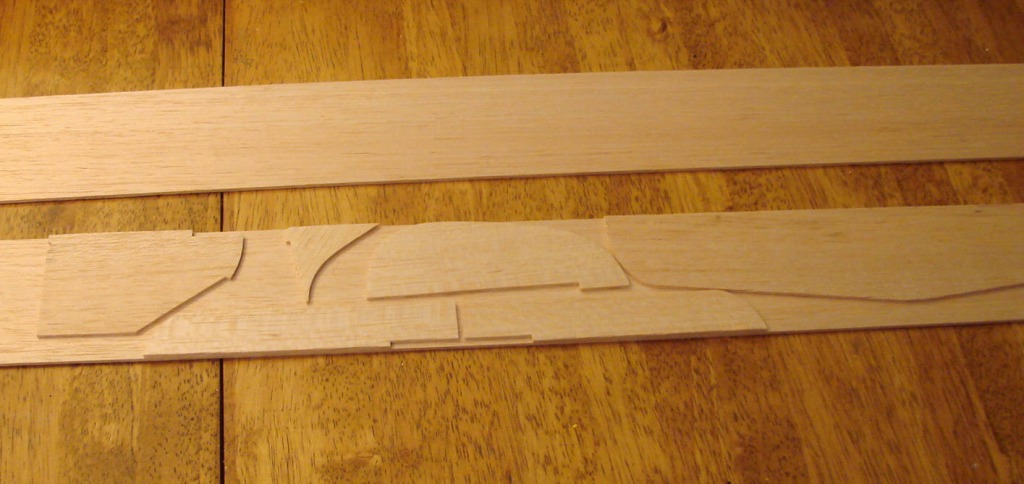
The tail feathers-3/32" pieces glued to a sheet of 3/32" and then to another. |
| David Duckett, Image # 4962 | 06 Nov 07 22:00 |
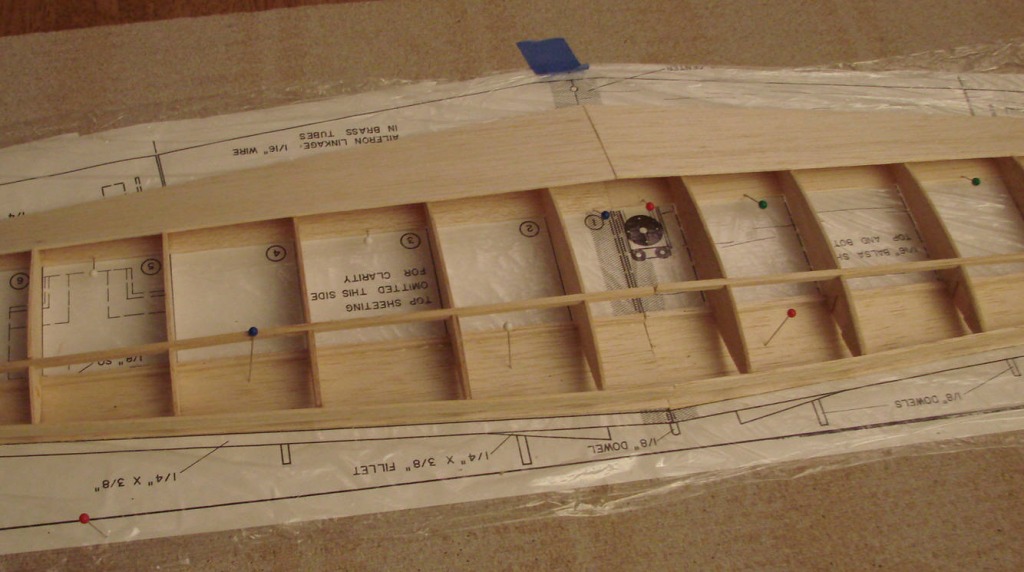
Except for the1/8" spar top and bottom this is all 1/16". There's another 1/8" piece under the trailing edge. |
| David Duckett, Comment for image # 4938 | 05 Nov 07 17:36 |
| Yeah it is a big bird. I'll seal the pores with silkspan (yuk, yuk) but I will also seal the entire area in front of the plastic piece, all the way around, with a liberal dose of micro-fill rubbed in with my fingers. It almost does the work by itself and just one application, when sanded down, seals the balsa quite well., nearly well enough to start painting on it. But, no....not quite. |
| moostang51, Comment for image # 4938 | 05 Nov 07 17:11 |
| Thanks DD. Big bird in the making. What are you going to use to seal all those balsa pores prior to painting? Options for a paint scheme for a FW are unlimited. Enjoy the build. |
| John M Oshust, Comment for image # 4938 | 05 Nov 07 08:15 |
| Any building project requires a great foundation. Your wood woeking craftsmanship really shows here. This plane should be awesome! |
| Build Thread, Page :
1 2 3 4 5 [ 6 ] 7 8 (144 posts, 20 posts per page, 8 pages in total)
|
[ < Prev ] [ Next > ] |
