| Build Thread, Page :
1 2 3 [ 4 ] 5 6 7 8 9 10 11 >> (268 posts, 20 posts per page, 14 pages in total)
|
[ < Prev ] [ Next > ] |
| pfinn, Comment for image # 14934 | 14 Nov 09 10:48 |
| Hey jimbo, I used the "Koh-i-noor" brand. He...He... I was trained in the PC epoch (Pre Cad) ;o). |
| David Duckett, Comment for image # 14934 | 13 Nov 09 20:15 |
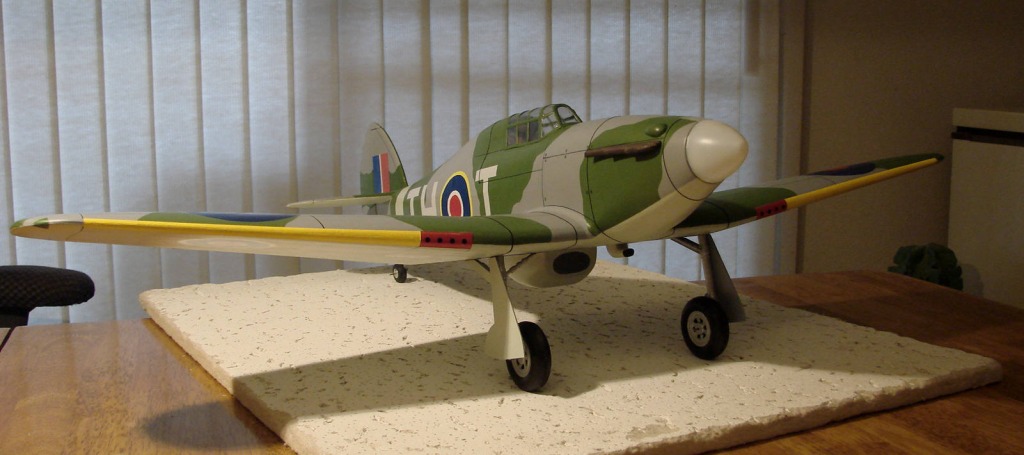
| Thanks, it's a hanger queen. To be fair, I learned of the pens from Poppy. I also use a Sharpie now and then but primarily a Top Flite Panel Line pen from Tower Hobbies. The two lines around the front fuselage are made with 1/64" Chartpak tape and the line dividing the center wing from the outer panels is 1/32" Chartpak. |
| John M Oshust, Comment for image # 14934 | 13 Nov 09 17:59 |
| I follow my mentor DD...Faber Castell. Sharpie gum up and stop working. |
| jimbothehotdog, Comment for image # 14934 | 13 Nov 09 15:12 |
| (Rapidograph) Makes me feel kinda old... :o) Have not used one in years, but I just came across a box at work with about 30 0.35 disposable plotter pens plus a whole box of tips with handles etc...thought might be useful for aircraft models. but yeah they probably will snag on the covering... |
| pfinn, Comment for image # 14934 | 13 Nov 09 14:01 |
| Boy, haven't heard "Rapidograph" in a looong time! A technical pen would work good but might "Hang up" if your surface is at all rough or uneven. Plus waiting for the ink to dry, or not waiting long enough and smearing, is and would be a drag. Some use Sharpie, DD here likes...ummm...Faber Castell?.. there's Gel ink markers. The list goes on. Try them and find out what you like best!
I've used 00 pinstriping brush (very long bristles), markers, and Prismacolor pencils. Experiment and have fun! The lines don't always have to be black! |
| jimbothehotdog, Comment for image # 14934 | 13 Nov 09 11:21 |
| What do you guys use to create the thin black lines that represent the control surfaces and gaps in the covering? I would think maybe a technical pen (Rapidograph, etc.)
Sorry if I ask lots of questions, this hobby is new to me and I am curious... |
| jimbothehotdog, Comment for image # 14934 | 13 Nov 09 10:57 |
| ...all it was at first was a couple wooden sticks and some tissue paper!! Awesome work!
Would you actually fly her? |
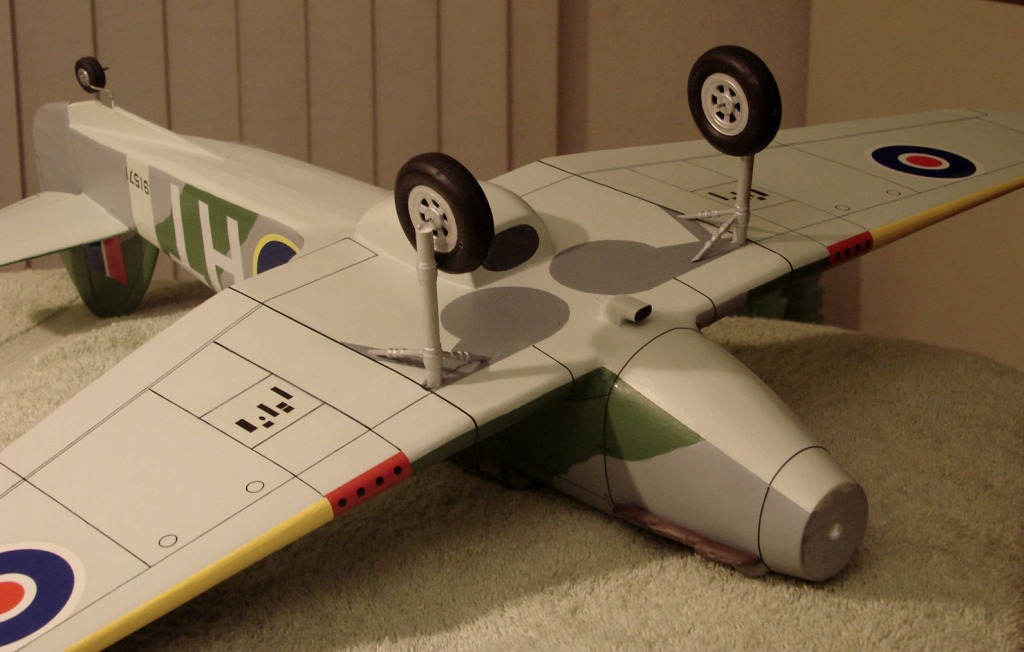
| RodN, Comment for image # 14932 | 13 Nov 09 00:10 |
| Like the Spit there are 2 flap positions - open and closed. |
| RodN, Comment for image # 14934 | 13 Nov 09 00:07 |
| Beautiful job David, you have certainly done the kit and the airplane justice! |
| pfinn, Comment for image # 14932 | 12 Nov 09 21:46 |
| Check out the position of those flaps. Whoa! |
| pfinn, Comment for image # 14935 | 12 Nov 09 21:45 |
| Got that right! He...He.. Awsome model. |
| David Duckett, Image # 14935 | 12 Nov 09 17:47 |
It's time to open the prop shop. |
| David Duckett, Image # 14934 | 12 Nov 09 17:46 |

|
| David Duckett, Image # 14933 | 12 Nov 09 17:46 |

Landing gear doors added. Like me, it looks better with pants on. |
| David Duckett, Image # 14932 | 12 Nov 09 17:44 |
|
| TJH, Comment for image # 14923 | 12 Nov 09 07:45 |
| Outstanding detail with household materials; amazing! |
| David Duckett, Image # 14924 | 12 Nov 09 07:24 |

|
| David Duckett, Image # 14923 | 12 Nov 09 07:23 |
The high tech landing gear, a straw, toothpicks, & masking tape, has been installed. |
| John M Oshust, Comment for image # 14766 | 11 Nov 09 18:34 |
| Ooops! |
| David Duckett, Comment for image # 14766 | 11 Nov 09 17:42 |
| Because it's not finished. |
| Build Thread, Page :
1 2 3 [ 4 ] 5 6 7 8 9 10 11 >> (268 posts, 20 posts per page, 14 pages in total)
|
[ < Prev ] [ Next > ] |
