| Build Thread, Page :
<< 44 45 46 47 48 [ 49 ] 50 51 (1013 posts, 20 posts per page, 51 pages in total)
|
[ < Prev ] [ Next > ] |
| Xanadu, Comment for image # 31099 | 11 Mar 14 21:34 |
| I often wondered where Gumby went. |
| John M Oshust, Comment for image # 31099 | 11 Mar 14 18:52 |
| Yes sir with our world of plastic pipes and electrical conduit we should be able to find a diameter to fit most scales, that is of course, if you want to take an extra effort to make "classy" wheels😄 |
| John M Oshust, Comment for image # 31101 | 11 Mar 14 18:07 |
| A 132 cm long thread gets you there for a 5.5 cm diameter rim. Better longer than shorter. If the lacing is almost complete and you run out of thread, you are not a "happy camper"....don't ask me how I know:-)) |
| John M Oshust, Image # 31107 | 11 Mar 14 17:54 |

JG....... I used an old fashioned concave rim maker. A chainsaw file held in my grand pappy's antique bench vise. Gee the vise is almost 100 years old! |
| Dale1416, Comment for image # 31099 | 11 Mar 14 17:45 |
| Excellent results with these new materials. |
| JohnG., Comment for image # 31100 | 11 Mar 14 17:37 |
| How and when did the outside diameter of the rim go from flat to concave??? |
| John M Oshust, Comment for image # 31099 | 11 Mar 14 15:24 |
| Thank you sir.. Covered wheels are a simple task when compared to spoking a set of these. My problem will be remembering the procedure for the next set😄 |
| meku, Comment for image # 31099 | 11 Mar 14 15:18 |
| Beautiful! |
| John M Oshust, Image # 31103 | 11 Mar 14 14:10 |

Initial attempt using Kevlar. II f asked I cannot find the words needed to describe this process. You just have to start, fail, and try again. Hoping the neurons can remember the procedure for wheel 2 tomorrow! |
| John M Oshust, Image # 31102 | 11 Mar 14 14:05 |

Gumby is elated. After at least five attempts the lacing pattern and method has been deciphered. |
| JohnG., Comment for image # 31101 | 11 Mar 14 14:04 |
| One single piece of thread??? |
| John M Oshust, Image # 31101 | 11 Mar 14 14:02 |
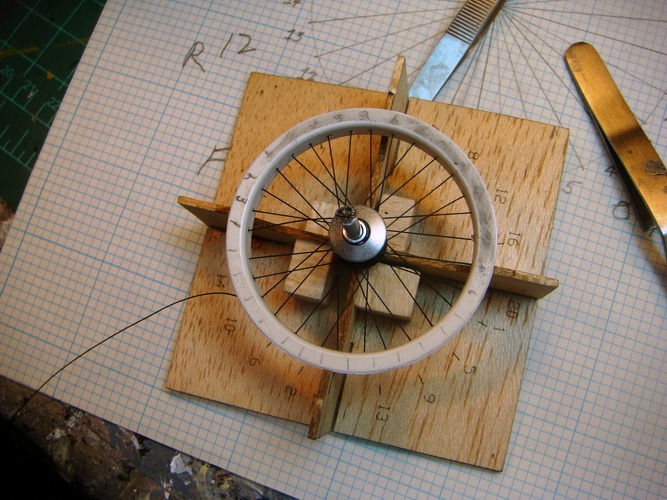
Changed the thread to surgical silk...it worked! |
| John M Oshust, Image # 31100 | 11 Mar 14 14:02 |

Spokes and tire valve installed. |
| John M Oshust, Image # 31099 | 11 Mar 14 14:00 |

Tire installed...one down, one to go! |
| John M Oshust, Comment for image # 31079 | 11 Mar 14 09:45 |
| Gumby is placing the rim upon the jig. There are photos in the thread showing placement. I use surgical silk or Kevlar. Kevlar is stronger takes abuse in flight models. Silk more refined, very strong, great for display. Mono-filament fishing line is another alternative. I am about to get Gumby to work. Prediction here is for mid 60 degree weather, I may have to take Nunzio out for a walk about:-)) |
| frwyflyer, Comment for image # 31079 | 11 Mar 14 09:07 |
| I suffer from confusion here which is a normal condition for me. I don't see the rim on the jig. I do like very much that hub with the domed end pieces and why the choice of Kevlar? |
| meku, Comment for image # 31002 | 11 Mar 14 02:23 |
| You can take advantage of.
http://s276.photobucket.com/user/Teus-nl/library/Instrument%20faces?sort=3&page=1 |
| FLYBOYZ, Comment for image # 31080 | 10 Mar 14 21:37 |
| How much is Gumby I need a good pair of very skilled hands at the shop.I see mass porduction.Tools you can never have to many:] |
| John M Oshust, Comment for image # 31080 | 10 Mar 14 18:21 |
| I hear you about the hand crank drill. I have one and started using it when I started modeling. Then, one day, the battery screwdriver was gazing up at me, from the bench. I had an epiphany, why not used your never hardly used screw driver as a drill! Now the hand crank drill hangs about observing, but I am sure, one day, he will be called into duty! |
| lukebozek1, Comment for image # 31080 | 10 Mar 14 18:13 |
| I use a Dremel but I also have a small handbcrank drill for this type of work. Nice alignment set-up John. |
| Build Thread, Page :
<< 44 45 46 47 48 [ 49 ] 50 51 (1013 posts, 20 posts per page, 51 pages in total)
|
[ < Prev ] [ Next > ] |
