| Build Thread, Page :
<< 35 36 37 38 39 [ 40 ] 41 42 43 (851 posts, 20 posts per page, 43 pages in total)
|
[ < Prev ] [ Next > ] |
| Skyediamonds1985, Image # 35010 | 17 Nov 15 19:32 |

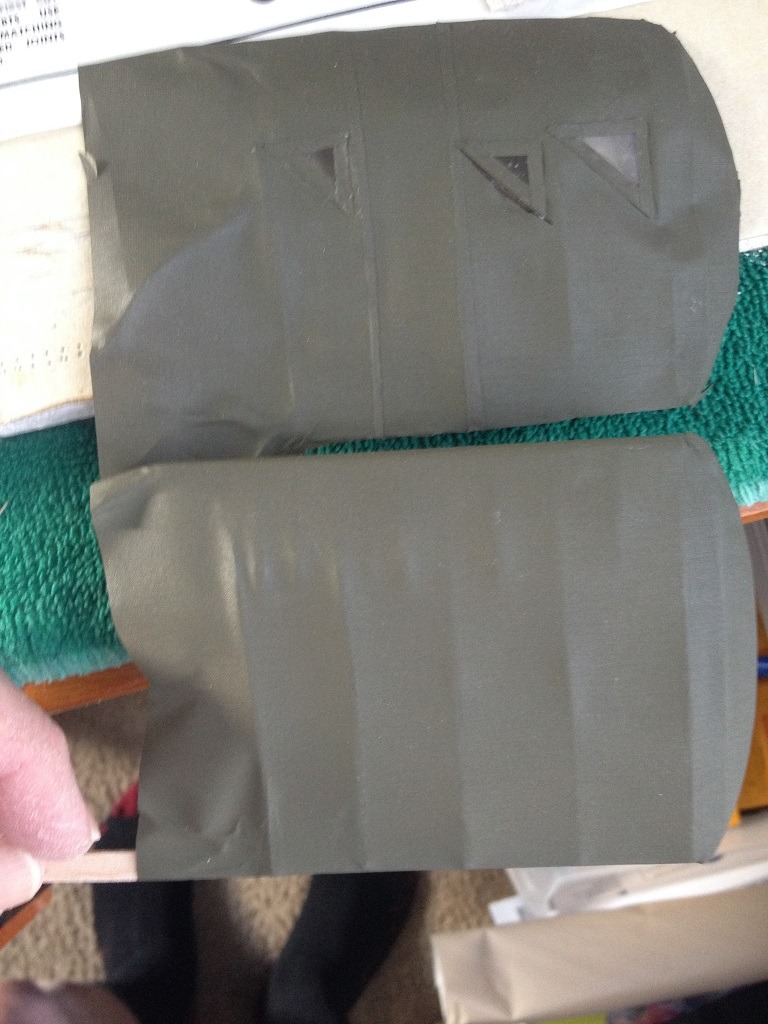
This is the underside of my faux sample wing where the aileron "cable" runs through. The hole nearest the rear spar is where the "cable" runs naturally through in a straight line. The second hole where the thread is coming through is the hole that more closely resembles the actual aircraft. Not totally accurate, but better than the original point of entry near the rear spar. |
| Skyediamonds1985, Image # 35009 | 17 Nov 15 19:29 |

As with almost anything in life of modeling, adding some special detailing oftentimes comes with additional work not anticipated. Such as it is with my intentions to add the inspection window to the wing. I realize that for the window to have its true purpose, I needed to also add the pulley system inside the wing. In my previous posts, this was long accepted. What I overlooked, is that now I can only cover the (say for example) the top surface of the wing, then add the aileron rigging and pulley system, then I can cover the bottom wing. Just more fun-filled work. |
| Skyediamonds1985, Image # 35006 | 17 Nov 15 15:43 |

My fourth try at installing the inspection window on the wing surface. Turned out, I only use glue. I thought if I used a heat iron on the strips of film would set off the adhesive and stick the whole assembly to the wing surface. I also thought an added "plus" would be that the additional heat from the iron would help tauten the wing surface further. What was happening, is due to the "hole" on the surface with no wooden support caused the surrounding opening and assembly to distort. In summary, the heat-shrink films are designed for covering a frame, not for supporting any assemblies, however small or light. |
| Skyediamonds1985, Image # 35000 | 16 Nov 15 21:44 |

Here, I will also hope to alter the original shape of the kit to reflect the outlines of the original aircraft. I've lowered the bottom keel outside of the plans. I'll have to break apart some of the fuselage formers and elongate them with some extra balsa bracing on the back. |
| Skyediamonds1985, Image # 34999 | 16 Nov 15 21:36 |

This is the section where I will be making some alterations to the original kit |
| Skyediamonds1985, Image # 34998 | 16 Nov 15 21:35 |

While continuing my trials on the wing inspection windows, I've started on the fuselage. My intent is to detail the cockpit interior as like the real airdraft |
| Skyediamonds1985, Image # 34997 | 16 Nov 15 21:04 |

Sample wing. About to try the experiment of installing the inspection window. Hope all this experimentation pays off. |
| Skyediamonds1985, Image # 34996 | 16 Nov 15 21:02 |
Just peeled off the old covering and sanded the frame. Reapplied the Solartex. You can see the old one above. Looks almost like old skin. |
| Skyediamonds1985, Image # 34992 | 16 Nov 15 11:37 |

Three strikes! In my haste, I forgot to add more glue to all of the surrounding cutout area. I need consistency in order to ensure that all this experiment is worth the effort. Now I'll have to rip off the whole surface of my sample wing and recover and try again. Any observations or suggestions? Will let you know of my efforts within the next day or so. |
| Skyediamonds1985, Image # 34991 | 16 Nov 15 11:30 |

Tried it again. This time I used more glue around the perimeter of the cut before installing the window assembly. Seems pretty good, but a bit oversized. Will try it again but smaller. |
| Skyediamonds1985, Image # 34990 | 16 Nov 15 11:27 |

Results were not all that encouraging. Apparently, the surrounding fabric "gives" whenever I applied the iron to the strips around the window |
| Skyediamonds1985, Image # 34989 | 16 Nov 15 11:19 |

After gluing the strips of Solartex around the plastic window, I used just a spot of glue to help hold the whole inspection window assembly in place while I used the iron to the fabric |
| Skyediamonds1985, Image # 34988 | 16 Nov 15 11:17 |

Used an X-Acto to cut out the surface outline |
| Skyediamonds1985, Image # 34987 | 16 Nov 15 11:16 |

Using a thin marker, I drew the outlines of the "window" on my sample wing. |
| Skyediamonds1985, Image # 34986 | 16 Nov 15 11:14 |

A close up photo from The Vintage Aviator website revealed that the inspection window had small screws or rivets. So, I used a large pin and pushed out some "rivets" from the backside of the plastic "window." I hope this feature shows through the strips of fabric covering. |
| Skyediamonds1985, Image # 34985 | 16 Nov 15 11:11 |

Marked off the appropriate size and shape of the plastic window itself. The outer and inner most lines denotes the fabric strip used to cover the edges and hold down the window. The middle line is the actual outline of the plastic window itself. |
| Skyediamonds1985, Image # 34984 | 16 Nov 15 11:08 |

I started by using some clear plastic packages used for my cylinder rings of the PT-17. Amazing how one manages to save such seemingly items destined to the trash bin |
| Skyediamonds1985, Image # 34983 | 16 Nov 15 11:05 |

Before starting on the fuselage, I thought I'd try one more experiment. The S.E. 5 was one of the very few, if not the only one, aircraft in production that featured inspection windows on the flying surfaces of both wings and horizontal stabilizer. These windows provided a quick peek at the pulley system and the control cables hidden inside to ensure that the cables had not slipped off the pulley. |
| rayl, Comment for image # 34977 | 15 Nov 15 10:08 |
| Bill, I have found that it removes everything but the Jappanning (the black "paint") used on old Stanley wood planes. |
| BillParker, Comment for image # 34977 | 15 Nov 15 09:53 |
| I used to sell that stuff, (not in a spray can) back in my automotive days. It's the best paint remover in the world, but it honestly require a full hazmat suit. No kidding, don't get ANY of that stuff on you. I can't believe it'd come in an aerosol. It's just plain NASTY.
|
| Build Thread, Page :
<< 35 36 37 38 39 [ 40 ] 41 42 43 (851 posts, 20 posts per page, 43 pages in total)
|
[ < Prev ] [ Next > ] |
